by Martypants | Oct 28, 2020 | General Pearls of Wisdom, Stuff for Foodies
I wanted to make black beans from scratch – and not from cans, either. Canned black beans are soft and gooey off the shelf – I wanted to have firmer beans that got their glorious goo from things I did on purpose – something much more detailed and elaborate than simply opening a can.
I decided to make them vegan this time too, as I figured it would come in handy to know how to do that. I know a LOT of nice Vegans that I might share a good dinner with, occasionally – I needed another ace up my sleeve for them. So here you go, Vegans – go grab your clay cooker.
 I was also using this outing to experiment with more things in my new clay cooker. I had a great little Romertopf forever, but then brought it to a dinner party a couple years ago and never got it back. Lucky for me, I found one at a junk store last month for $20, brand-spanking-new – it is a little larger than my last one, and has a glazed interior, which were both cool perks.
These vegan beans were one of the first couple things I cooked in it, after some delicious chicken and pork dinners were nailed righteously.
Note that this recipe is meant to spread-out over a couple days – it takes a long time to make dry beans into eatable beans. More time still, to make them delicious! It is totally worth it though, and it is not a lot of time prepping as much as simply a long time to cook. I tend to find this pretty therapeutic, but I am admittedly and unashamedly a weirdo.
Soak Your Beans – 12 Hours at Least – and Your Cooker
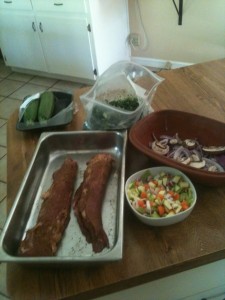
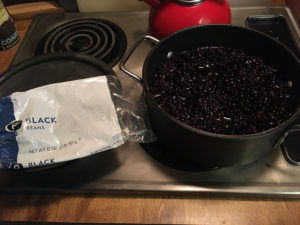 So in typical black bean fashion, I started with a bag of generic dry black beans – 32 oz. I submerged them in a lidded pan full of warm water, about 4 quarts worth, and let them sit, covered, for a total of about 24 hours.
Note that they will increase in size (about double) once they soak up that water – -so ensure you have enough fluid there to soak-up…I have often used too little, and the beans simply soak it up too quickly and won’t fully soften. Err on the side of having too much than otherwise – you can’t really have too much water, but you can certainly have too little.
I have also tried pre-soaking in broth for adding flavor a couple times, but didn’t notice enough impact to do it again – water works just fine.
 After they have properly soaked (minimum time would be overnight), I rinse them well, and set them aside for a while to prep the veggies. Rinsing only helps get the gunk off them – look for stones too, which I actually see in there pretty often. The beans will be pretty uniformly the same when they are soaked well.
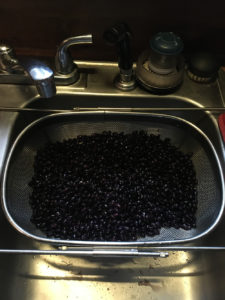
When you are ready to actually make the beans, as with any time you use the cooker, you want to soak the lid (at least – you can soak both sides of the cooker if you’d like)…this will create steam, and helps preserve the moisture of anything you cook.
I try to let it soak for about an hour while I am prepping other stuff, but not sure what the manufacturer would suggest. An hour has done fine for me for years.
Chop Your Veggies
 When I make black beans, I make them the way I learned in the Jamaican restaurant I worked in during the late 80s/early 90s – because they did them so wonderfully. It is a kind of “kitchen sink” approach to it – you throw in anything you got, and know you are generally only going to make them better if you have more stuff in there and cook them down long enough.
An important break from my norm here, was doing this totally vegan. I typically would put some pork bits in there, like salt pork or bacon or fatback, to cook down a little fat and make the beans more succulent – but that would not make the Vegans smile, so not this time. Understand though, you can definitely add some pork bits in right here, and that would not hurt the beans at all if you aren’t preoccupied pleasing Vegans. It might add to the time you cook everything, but it is well worth it.
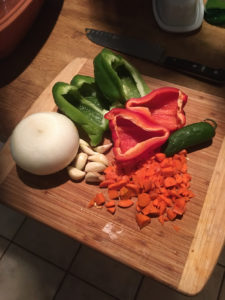
For these beans, I went with what I had on-hand – a couple bell peppers, a kind of sad and wrinkled jalapeño (with all seeds intact for some heat), onion, garlic, and carrots. Carrots were kind of a weird thing, but I figured if cut small enough they would simply add a little body and flavor to the base of it all. It is a trick I learned with marinara sauce – if you add carrots to a tomato sauce, it can be lovely. Same theory here.
Cutting these veggies really small was also something I did on purpose, because of the way the clay cooker works. I knew that if I cut them really small and put them under the beans, they would essentially melt down for me, and help create a luscious layer of flavor. They would be bathing in broth, and all would be right with the world.
I knew that I would never see these veggies again, and I was OK with that. If I wanted them to remain in the mix, I could have used a larger cut so it didn’t melt down in the heat and juice…it depends what you want your finished beans to be like.
So understand that while I used the vegetables that I used this time, you can use whatever you got hanging around. Onions, peppers and garlic would seem pretty necessary to me, and from there, you can wing it. Empty the fridge…I can’t think of anything that would hurt you here, while some choices (like corn, or artichokes) might just be a little weird. In the Jamaican place, we threw a ton of stuff in there while they cooked so go nuts if you like.
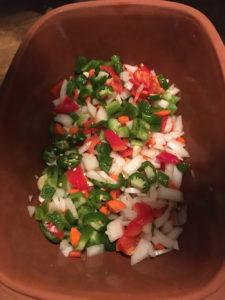
One cool thing about using the clay cooker for these, is knowing my veggies will cook off nicely under all the beans – I have tested this theory before, in layering the clay cooker different ways. If I were using a kettle on the stovetop, the vegetables would not render down the same way, and would tend to hold more of their original shape/texture unless I rendered them down…it takes much longer and a different cooking manner for the same effect to occur.
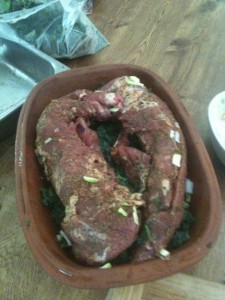
Once I put the small-chopped veggies in the cooker, I put the rinsed (and now air-dry) beans on top of them. And then the fun part could finally begin – the seasoning!
Spice It Up!!!
 In much the same manner as emptying your fridge to build an interesting undertone, the spices you use for your beans are going to become the true stars of the show.
Beans by themselves, even with the help of some nice aromatic vegetables, are bland as can be. Dry spices and fresh herbs bring the right dimensions to your efforts. You will be rewarded handsomely for taking your time on this step of the process.
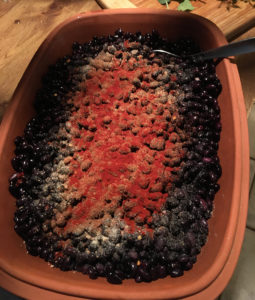
I don’t hesitate to go right in there, and get it all going when I am doing beans – there is not much that is off-limits. The staples, would be healthy doses of garlic and onion powder for added strength (we have them chopped, too, remember), cumin, allspice, crushed red pepper, chili powder, rosemary, basil and oregano. I personally like adding a combo of cinnamon, nutmeg and ginger root too, as they blend in this wonderfully Mediterranean kind of way.
 I don’t stop there though, and will grab thyme, coriander, marjoram, bay leaves…anything and everything might get thrown in for good measure.
Salt and pepper too (white pepper is excellent in these), but I tend to go light with additional salt (blood pressure reasons)…people can always add that later, if they like, but it should be far from necessary to get salty in here if you properly go to town with this spice-it-up step. A lot of dry spices and fresh herbs will pop right through the beans, and layer them with all the flavors and complexities you are looking for.
What I did here, was to add all the spices to the beans, then I very carefully stirred them so as to not disturb the veggie layer underneath. In retrospect, I should have probably mixed the dry spices in a bowl, added the beans to properly coat them, then put the fully-seasoned beans on top of the veggies. oops – not this time.
 It did not matter – in much the same way, it does not matter what you do for your spices as long as you understand to be happy and liberal with them. If you have a lot of fresh stuff on hand, even better – I didn’t, so went with the stuff I did have and knew they’d be wonderful.
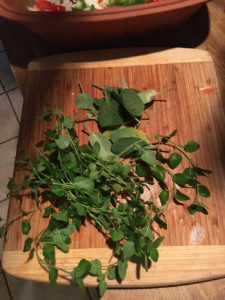 Once I had the dry spices mixed in the beans, I went to the herb garden and pulled some oregano and sage – they were again, the ones that were there, so they were nominated. Rosemary, fresh, is perfect for beans – basil works well too, as will cilantro, tarragon and most things your herb garden might have.
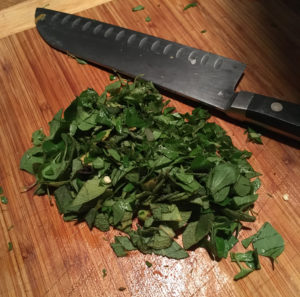 For these, I dry-spiced and mixed the beans, then I added 2 boxes of vegetable broth. I chopped my fresh herbs and put them on top of the finished beans – they were intentionally last, much the same way the veggie layer was first. Why? To take full advantage of the way the clay cooker works.
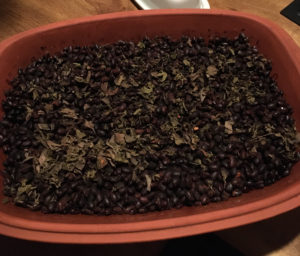
The 2 boxes of veggie broth did not come up over the top of the beans (more about this later) but came up about a half-inch or maybe a bit more than that from the top.
 When I put the chopped herbs on the beans I knew they would stay there – that the heat and steam in the cooker would activate them wonderfully, and behave differently than if I were to stir the fresh herbs into the beans. I wanted the fresh herbs to steam and dry out, but stay more or less intact – so a specific placement in the cooker, was key.
Once there was a healthy bit of dry spice on the beans and the broth was under there, as well as a nice layer of veggies on the bottom and aromatic fresh herbs on top, and the cooker top was soaking the whole time I was prepping this stuff, this was ready to go in the oven.
Crucial Cooking Times
 I tend to find in clay cooking, there are two general ways to go – either low and slow, or hot and quick. Both methods have their benefits and limitations, depending on what you are cooking. Beans like this, without any meat or grease in them, should probably be somewhere in the middle of that.
I put mine in the oven at 325 – and let it cook for four hours. I was thinking a low, slower heat would be the thing here, but I can admit freely, I was a little off in my calculation.
My first mistake, was not adding enough broth or liquid to them. I put in 2 boxes of broth, but I had a LOT of beans here, so I needed more. I could’ve easily added water – or beer, or more veggie broth. You want to bring the liquid level up to the beans – I don’t think you need to submerge them completely, but you do want them to be moist all the way up.
 What happened with mine, was in the time they cooked, the broth got sucked up into the beans – so there was not originally a lot of that “glorious goo” I mentioned at the beginning of this. Ooops. The flavor was still amazing, and the beans had a great consistency to them – but I wanted them still a little softer, which I could’ve had with more liquid, and maybe playing with the heat some and making it hotter in there.
One thing to do with the clay cooker sometimes, is start it out hot and then lower the temp. You might go after 450 to get things started, and after an hour or two, drop that down 50 or 100 degrees. What that does, is it creates the steam/boiling heat you want, then you mellow it out for a longer period of time…but the clay holds a ton of residual heat that cooks stuff really evenly.
It is very hard to make a mistake that you don’t want to eat anyway, when you are using the clay cooker. I didn’t think of these as a mistake by any means, but just thought I could have done one step better. I like the learning curve here – not hard to take.
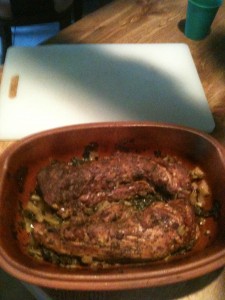
 When I took the beans out, the herbs on top were dried and fragrant – so I stirred them into the mix. I pulled up the veggies too, or whatever was left of them really…they behaved perfectly and were simply part of the beans now.
 Unlike a can of beans, these had all retained their body – they smelled incredible too, with all those spices and herbs just dancing around the kitchen.
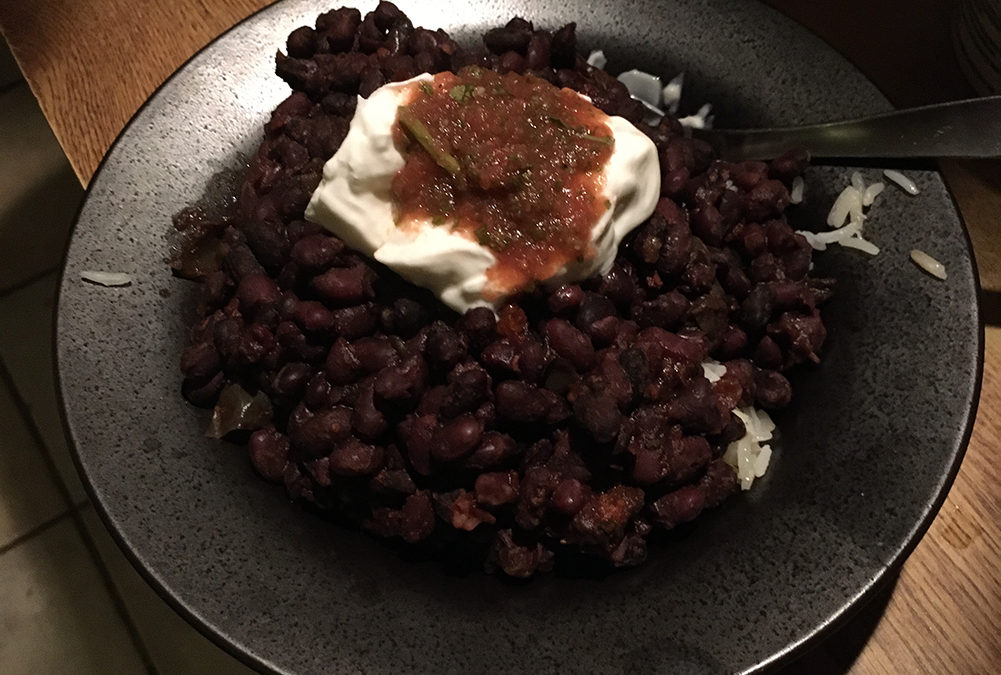
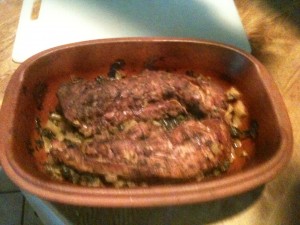
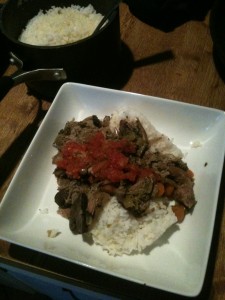
I ate a bowl of them immediately (over white, Basmati rice), and then I added some warm water and a room temperature beer, and threw them back in the oven for another two hours at 450 this time, to get them boiling.
When I pulled them out after the extra time, they were PERFECT – they had the right tenderness to them, and there was a delicious kind of sauce that was simply residual stuff from the long cooking time and extra fluid.
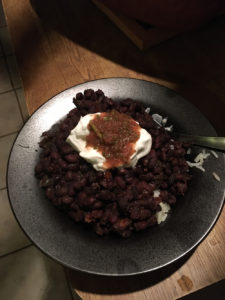 I broke my rules too, and had to top this off with sour cream and salsa – sour cream may not be vegan, but it is a great add to black beans. I might even go as far as mandatory, but like I said before, I am pretty weird. Vegans might substitute something else here, but I wanted the dairy and I did lay off the salt pork, so felt vindicated. I was alone anyway, so no harm, no foul.
And That’s That
So that was it here – I made a ton of these things, as you can see. I ate them every day for 4 days in a row, then I froze a big bag of them to have later.
Next time, I am gonna go back to adding some salt pork to it – I just prefer them to have some meatiness in there. But these were in no way lacking – they had flavor for miles, and a texture that is hard to get outside of a restaurant that does these for days at each cook, like we did at the Jamaican place. The beans there would cook for 2 full days before they were served – I cut it down to a few hours here. Know that if you add more time to them, they break down more (like refried beans) and get ever more soft and delicious.
As always, if you have questions fire away – and if you have any tips or tricks to share, please do so!
Bon appetit to you all!
by Marty | Apr 18, 2014 | Stuff for Foodies
Clay Cooker Pork Loin
 This week, a nice lady named Pam commented on a post in here somewhere, where I talk about making brisket and we talked about using the Romertopf clay cooker. I said I was a huge fan of mine, and had it now for about 20 years I think – but Pam said, she never cooked meats in hers. I was amazed–I think that is the thing these cookers do best, so I was inspired to make something in it.
I had a pork loin thawed, so rather than grill it as I was going to do, I aimed it for the clay cooker. 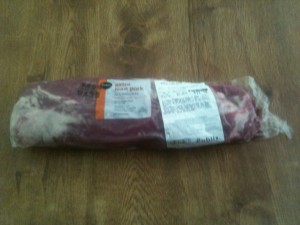
The Pork Loin was about 2 1/2 pounds, and they called it “extra lean” and it was in fact, very well trimmed so I didn’t have to do more to it.
While I got the meat ready, I soaked the clay cooker in the sink in cool water. You have to do this with a cooker, or they may crack on you in the oven. When you’re prepping stuff, a good 10-20 minute soak will do you well.
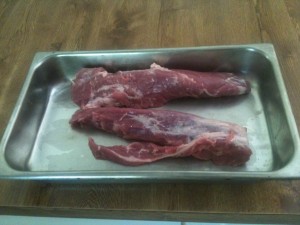 I dropped these into a hotel half-pan. As you can see, it is two nice pieces there- I could have tied it up, but leaving them flopping solo was fine by me.
For seasoning them, 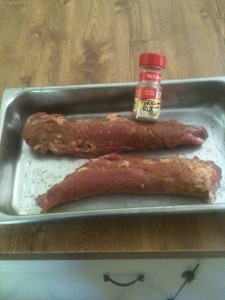 you could do whatever you like to do with pork. I love playing around with spice blends and rubs– and had some of my own mix, a pork rub I made for a butt roast a few weeks ago. I keep empty spice jars, so when I have excess doing a rub, I can use it again.
This one had dry cumin, some cinnamon, allspice and brown sugar, salt and pepper, fresh ground sage & tarragon, chili powder and god knows what else. I can get a little nutty, trying to build really complex seasoning…but I did not coat it real heavy, just very consistently.
Layering it Up
One thing I like in clay cooking meats, is to layer up veggies under the meat. What it does is soak up, and add to flavors and texture of the cooking meat – it is a wonderfully self-contained meal when you’re done, too.
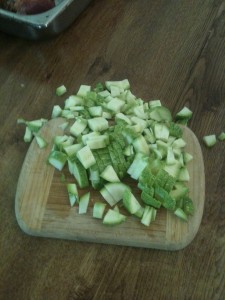 I suppose I could have been more deliberate in which veggies I picked, but I was simply going with whatever I had here. I had some zucchini, so that was chopped up. I like the basic soup stock veggies, but did not have any celery–no worries, I used carrots and red onion anyway.
A new one for me on this one, was kale- I had a bag of frozen kale, shredded, so thought it would be perfect: pork loin and southern greens.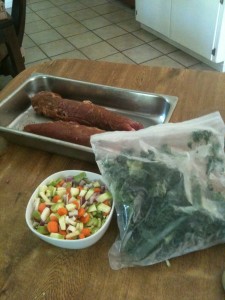 The way the cooker works greens like kale are really nice, because cooking them longer only makes them more tender.
I also like having veggies between the meat and the cooker, because I have had meats bake into the side of the cooker, then fall apart on me as I try to get it free. Not always a bad thing, but the veggies don’t stick like that for me, so it helps.
Plus, like I said, I was going for something here–so I put red onion and portobello mushrooms as my root layer. Then, the chopped veggies. Then, a bunch of kale. I figured the lower veggies would quickly cook down into a stock-ish blend, adding a ton of body to the pork and greens.
 Once I had all the layers in place, I laid the two pork loins on top of it. Those little renegade zuke chunks, were because I had to roll it into place. But this was a nice, full cooker- ready to go in the oven.
Baking in the Clay Cooker
 The key with the clay cooker, other than the pre-soak, is to put it in the oven, cold- and turn on the temp you want. You don’t want to pre-heat the oven: again, that may cause damage to the cooker.
Instead, the heat comes up in it gradually- and it steams, and bakes at the same time.
In this case, I set a low temp, because I was aiming it for when my wife got home from work…so with the 2.5 pound size, I gave it about 2 1/2 hours, at 325 degrees. an hour per pound, low temp- erring on the side of a little longer, likely is better (or a little more heat). It is a thing to learn, how to time and heat these things, so the meats come out as you want.
The beauty of clay cookers, is once it goes in the oven, you really are about done until you eat…it works better, if you never open it or have to mess with it. If your heat is too high, or you go too long, you basically turn everything in it into soup–it may taste wonderful, but it tend to lose a lot of color and body.
Oops
 So remember in that last paragraph, when I was talking about going a bit too long? Well, my wife was a hour late from work this night, so rather than stop it, I simply let it go another extra hour…same temp. Oops.
Not that I minded one little bit…the pictures do not do this justice, as it was really beautiful. You can see, compared to when the kale was uncooked, how it went down a few inches in there…and the aroma, was pure heaven–for hours, the house smelled simply fantastic, it was a very comforting thing. Actually (I made this 2 nights ago) this morning, there were still traces of the scent in my stairwell to the basement–yesterday, it was still very strong. Very cool side effect.
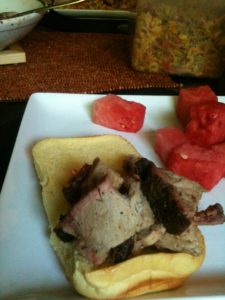
 So looking at it, done, it seemed a silly amount of food for just the two of us…even with leftovers, this was a lot of dinner. No worries: I just lifted out one of the pork loins, shredded it, and immediately put it into the freezer for this weekend. I am gonna take it out, frozen, and cube it – then heat it up in a homemade BBQ so we get to love on it again.
 For dinner that night, I made some Basmati rice (1 cup rice, 1 3/4 cup water and a splash of olive oil. bring to boil, cover, lower heat- simmering for 15 minutes or so. Turn off heat, and leave covered to absorb water- perfect, every time), knowing it would be perfect with the greens and pork.
I did have thoughts about slicing it into roulades- but as soon as I touched the one to move it, I knew I was not going to cut anything. If I would have removed it when I planned to, I could have- but the extra hour really made this guy soft.
OK- I fork-split it up (eating all kinds of taste samples): both the one I froze, and the one for dinner. Took me one minute to mash the meat into the greens, so it was like a pork loin stew.
 When I plated it, like the redneck I am, I added salsa and sour cream to it- but it needed nothing. I think I just wanted some red color, and I am a redneck, so salsa and sour cream make everything better.
The pork loin was wonderous though–super moist (clay cooking RULES!!!), the rub came thru with some great flavors and scents, and the greens were perfect. The non-freezer leftovers did not even make it past lunchtime yesterday…I may be getting into that freezer bag a little sooner than expected.
But that is a very simple, easy to replicate recipe for some really, really delicious pork loin in a clay cooker. Pam said her family was still in the throes of a well-cooked brisket: but I am betting, her clay cooker starts seeing a lot more meats. I thank her for the inspiration to do this anyway–any excuse, is a good one to bust out the clay cooker.
Later Add: To satisfy my own curiosity and make sure I was not messing up, I did one this week in the clay cooker using only a dry rub on it for a bit, about 2 pounds and cooked it at 410 for 1 hour. I pre-soaked the cooker, and did NOT add any extra liquid to it. It cooked beautifully- I took it out, and let it rest in the cooker to finish/cool a bit and temp leveled at a fine 168 for me. Held its shape a lot more, so if you want roulade-type cuts when completed, hotter, less time worked well for me. For shredding/cuban styled pork cook it long and slow- either way, you win.
by Marty | May 13, 2013 | Stuff for Foodies
No – this does not mean I am more than a fan of farting. Although they are usually funny.
Eons ago, I used to do electrical work. In a bathroom, the exhaust fan is referred to as a “fart fan” by sparkies because of its obvious purpose. Every bathroom has them (or should).
I had one in my house that was making some weird noises (sounded like a burned out bearing) so yesterday, I replaced it. However, I did not throw the old one out – I cleaned it out and fixed it, and figured out a great use for it.
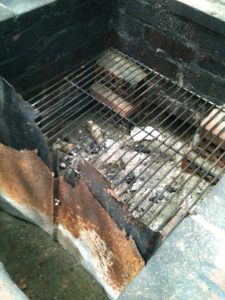
The Beast
The Beast is a great BBQ despite how ugly she is, but it does have some air-flow inconsistencies, especially after I added some new stuff inside it. I would always address this previously by dropping flaming paper down the chimney – it would usually pull  the air back up and thru that way. Once primed right, it would cruise. But I might need to do that once an hour or so – which was a big pain, and it made it hard to gauge the cooking time which became kind of inconsistent.
So I cut the cord off an old saw that was otherwise useless, and hardwired it into the old fart fan, so it has a plug. I ran an extension cord (which my wife hates me for), and put that fan on top of the chimney and fired it up – the result, was incredible air flow control…it worked perfectly. I have 2 picnic shoulder cuts on there right now, easing their way into delicious over the course of this afternoon….but this new way to control the air in there is going to make it much easier for me to master, and get exactly where I want it to be.
Or so I think – we’ll see what the pork shoulders come out like. Chopped pork is on the menu tonight, so I have a lot riding on it.
Probably more faith than anyone has ever put into a fart fan before.
…later
OK – it is the next day, and I couldn’t have been more pleased with the way that thing worked.
I had intended to only use it occasionally, to recreate the natural draw. But once it started going, I decided to simply let it go, and see what happened.
The steady draw was great for the fire, and great for the meat. It created enough draw to pull the top down tighter – so pulling it up when it was cooking was actually effort – that has never been before. But I loved it – the fan was like a car exhaust or industrial smokestack, just steady. Smelled better than a paper mill though! Here’s a minute or two video clip of it working.
I was able to leave it alone the whole time, and simply stirred coals, and added more hickory to them a couple times.
I cooked it like that for 4 hours – bringing internal temps in the shoulders to 165-170.
I took ’em off, wrapped them in foil and put them in the microwave, to rest – usually, I use a little cooler for that, but was too lazy to go to the basement to get it.
After about 30 minutes of letting them sit in their own juices, I carved them up.
Shoulders aren’t as good for BBQ as butts, in that they are simply tougher, more fatty…and these were kind of cheap, as far as that goes.
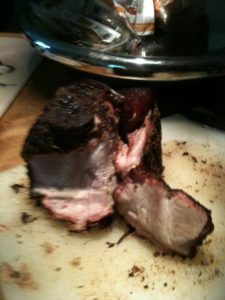
But the flavor was PHENOMENAL – check out that smoke ring, it goes in almost a half inch in places. The marrow in the bones was delicious too – but only I ate that, while I was messing with carving it.
I chopped it all up, put it in a big bowl and made a vinegary BBQ sauce for it (on the side, of course). Had these little soft potato rolls, so it was heavenly. My friend Lee should be drooling right about now, wishing they had BBQ like this in Prague.
 By the end of it all, the fart fan was a champ and a half – made it super easy to use the Beast more efficiently. I am the fart fan’s biggest fan.
Here’s what it looked like, after 4 hours of work…it smells wonderful, despite how it looks. I may have to do a different top for it – this was more of a trial run, just to see what it could do. This was easy though, and I can always clean the top, if I cared. A brand new fart fan is $16, so at least I have a plan that has been tested well. I will say though, if yours ever looks like this one does when it is still in your bathroom, you may have some bigger problems to face. 🙂
by Marty | Apr 16, 2013 | Stuff for Foodies
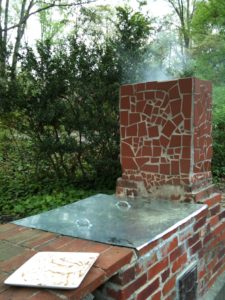
Oh, the spring is a wonderful thing. Despite the gag-inducing pollen in Atlanta, warm weather means more cooking outside – so I decided to fix the Beast.
In 2002, I was determined to make a brick BBQ because we had some bricks laying around. And lots of trees – oaks and hickorys, all there for the proper using in a wood burning BBQ. I didn’t know anything about making a BBQ but did it anyway – I am never one to let things like that stop me.
The Beast was a true champ for years – but in time, my ill-conceived design started to show some age, and it got to a point where I did not use her so often, because it was becoming a lot of effort. Then it fell into more disrepair, and I did not even think about using her for well over a year. I honestly couldn’t use her safely or effectively – she was down for the count it seemed.
But this year, I wanted her back – so I spent Easter weekend cleaning her out, mixing concrete, and repairing her. She’s an ugly old bird anyway – I simply wanted her to work as she once did, which was perfectly.
 Long story short, I made a new top and even put handles in it – then I smashed down the edges of the new top with a brick, so it fits this thing exclusively. I reattached the fire door, which is handy when it is operating. I also concreted bricks inside, both to hold the grill and to prop the new metal wall I added.
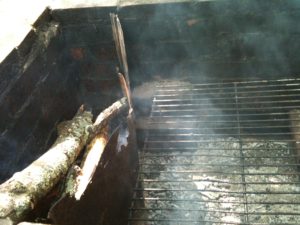
This was a new thing for the Beast: I built an interior wall, so I could do more indirect cooking. The Beast has always had a lovely air flow, so I wanted to see if I could maximize it, and wall off the heat entirely…it had always worked best as a semi-indirect source. I cut one of the old top pieces and bolted it together, and it bowed in perfectly as I saw it in my head. (It is those jagged pieces you see to the left.)
The idea was, build a big fire, and then use the metal wall to pull it all to one side, away from the meat.
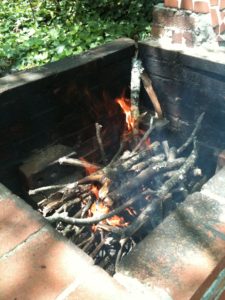
So I went into the yard and pulled up some big hickory branches, busting them into proper size. It had been a while, so there was plenty of stuff to find…I filled a wheelbarrow in a couple minutes.
Took me no time to get it blazing – and I kept feeding it for a while, making it big and hot.
Once I had the fire going good, I tried to use the metal wall to slide it all over to one side. What I did not consider, was just how hot it would become in there, and how moving it around was like reaching into Satan’s colon.
Oops.
 But I used a big metal bar I had, and got the majority of it where I needed it to be…then forced the wall in there to hold it all. That worked really well actually – but actually moving the fire and coals, not so much.
I got them all in place though, and put more fresh wood on it to keep it going a long time. There was very little fire/coals left on the side where I put the grill back in.
Rubbed Down Ribs
 So for her inaugural rebirth run, I wanted to make ribs, one of my favorite BBQ specialties. I had some old ribs in the freezer, so thawed them out – had 6 racks of baby backs. Made a dry rub and while I built the fire, I had them sitting in it.
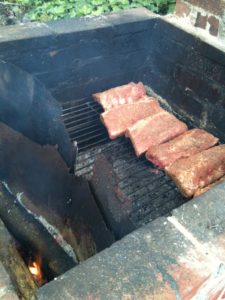 I wanted to see what the Beast could do on her own merits, especially indirectly, so I simply put the ribs on the grill, away from the fire/coals.
 Now the way she always worked in the past, once you got a good flow going thru the chimney, it always held. But the wall inside, and maybe the bricks I concreted in there to hold the grill, were changing the flow, and it was not so consistent.
When it works well it works well – and smoke billows steadily thru the chimney. But the wall was making the smoke stop in the cooking chamber, opposed to flowing out – so I had to prime the chimney multiple times by lighting a piece of paper, and dropping it down.
But it cooked all afternoon, and I left the ribs where I put them on the grill, only tending the fire and air flow.
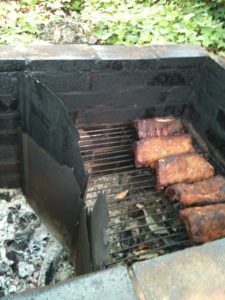
 After about 3 hours, they were done – and the heat was NEVER direct on them. I could’ve had this a lot hotter, actually – so maybe next time, I blend in some wood-based charcoal or something.
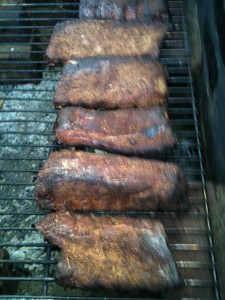
Still, the rub was great, and the ribs were fabulous.
 I cut them all individually (they don’t shrink so much if you cook them like this), and noted a decent smoke ring.
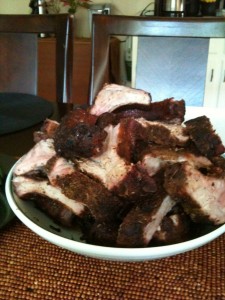
I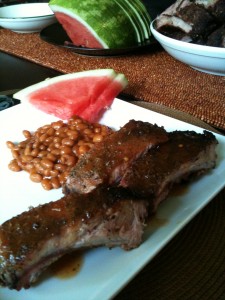 don’t always sauce my ribs – sometimes I do, but sometimes I do like to make and serve them dry.
I made a Carolina BBQ sauce for these, which is very vinegary and watery – but it was PERFECT for the ribs…they needed it, but you didn’t know until you tried it.
I served it with only thinly sliced watermelon and beans – but no one complained. 🙂
So the Beast is back – and though I need to figure out how to maximize that air flow again, in the meantime, I will enjoy feeding my wife and friends ribs, briskets, turkeys and whatever else I decide needs to be slow cooked this summer!

by Marty | Apr 9, 2013 | Stuff for Foodies
Ok – this one is both for my son Zach, and my mom – who both asked about this recipe. Zach is being a huge PIA about it, because the last one I made for him he devoured, so I guess he wants to impress his friends and make one at Auburn…so let’s get on with it.
 Beef Brisket is one of the easiest things to make – which rules, because it is delicious.
Ideally, you want to cook a brisket with indirect heat for a long time – I use The Beast (my homemade brick BBQ) and oak/hickory when I can, and they come out truly stellar. But sometimes I am stuck inside, so have to use the oven so this recipe is based on oven cooking. If you can manage indirect heat and smoke, that is WAAAY better – but that is not always so easy to accomplish.
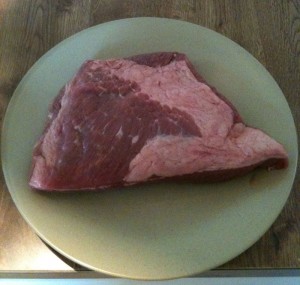
But you can see, a brisket is cut leaving a big layer of fat on one side of it – that little bit of meat crawling over the left here in the pic, is not always there – most times, you see only the white fat there. Unlike other types of meats, you want to leave this fat on there – no need to trim it away…it becomes part of your delicious.
This one is about 2 1/2 pounds – typical for this cut. You can get bigger ones – just be clear on your cooking times, and make sure you block out enough time to do it.
The key in a brisket, is cooking it long and slow – letting that fat melt down into the meat, flavoring and tenderizing it wonderfully. So like many long cooked meats, this one is best served by applying a nice dry rub of spices on it to bring out the flavors and character you are after here.
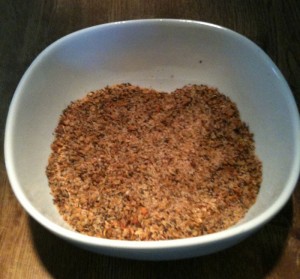
 So the rub I like to use, is based on garlic, onion, salt/pepper, and a little hot stuff. You can make one out of whatever you like (and Zach, the one you want used all of the pictured spices plus some thyme). How heavy you go with any of these, or what kind of blend you create is really the signature of the thing here – because this is all there is to a brisket.
Whatever you choose to blend for your spices, mix them in a bowl so they are well blended.
 Now I do have to say, I mixed more than I needed for this one – and should have probably simply taken some of that extra, and saved it for something else – but instead, I used it all.
Once the blend is achieved, rub it into the meat – and I mean rub it in there good. You want there to be no more raw meat or fat showing anywhere – it all needs your spicy goodness.
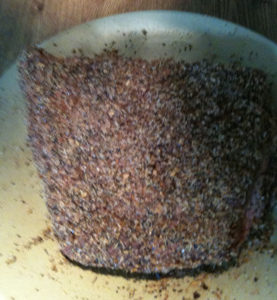 On the right over here, I have the brisket all rubbed down – you can see how thick I went with it. Do you have to go this far? No – but you do want to cover it well, because a brisket on its own is not the most flavorful thing in the world. And going a little heavy is not usually a problem because you cut it into thin strips – so a lot of seasoning on a little part helps to carry it thru.
But once you have the meat seasoned well, you are almost done with this thing – the hard part is really getting the proper blend of your spices.
The only thing you need to do now, and it is REALLY important – is to make sure the fat side is up – not down. You want that fat to melt, and drip thru your brisket – so having it fat-side up means you are ready to go.
Cooking Your Brisket
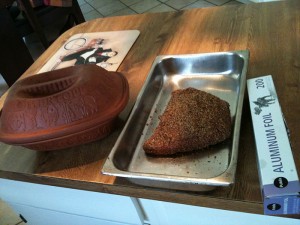 Now, my preferred way to cook a brisket (and a lot of other things) indoors, is using my Romertopf clay cooker. It is over there on the left – and like the name implies, is a clay cooker that treats anything inside it really nicely. But Zach doesn’t have one at Auburn, so I decided I would do this is a simple metal roasting pan.
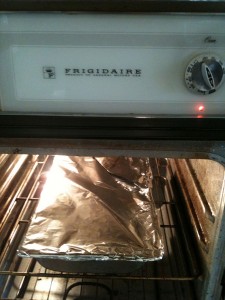 If you are unlucky enough to NOT have a clay cooker yet (eediots!), all you need is a pan big enough to hold it, and some tinfoil to wrap it up tight. Make a good seal around the edges – you are essentially creating a covered dish.
But I don’t even pre-heat the oven for these – I simply put it in there at 275° and let it go.
And yes – I did say 275° – because a low heat is needed to cook it long, and slow. Give it about an hour and a half per pound at that temp. I simply put it in the oven, set my timer, and walk away.
NEVER open the door, or check on it – it is fine, and you don’t want the heat to escape. You don’t baste it, you don’t have to do anything except leave it alone.
Because the one I had was 2 1/2 pounds, I did it for just over 3 hours – at about 280° – because I was timing it for a specific dinner hour. I could’ve gone another hour on it, and it would not have hurt it a bit. But low heat, long time. You go now.
Finishing the Brisket
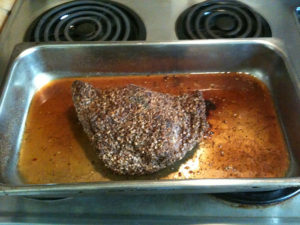 OK – after all that time, I take off the tinfoil, and I have what is actually a pretty dry piece of meat, and some lovely au jus.
I let it rest for about 10 minutes, then I take the meat to a cutting board, and pour off that au jus into a bowl, and put a ladle in it – I like it just as it is. You could easily make it into a killer gravy by heating it up and adding a roux, but the jus on its own is super flavorful, and perfect as it is.
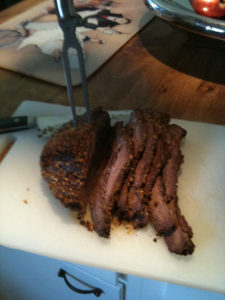 The last thing (before devouring it) is slicing it – go across the grain, and cut it into thin strips. If there is any fat left from the thick strip after cooking, it will be a thin, seasoned layer – and it is truly wondrous.
That’s it though – slice it thin, serve it with the au jus, and tell ’em Marty sent you. 🙂
by Marty | Feb 14, 2013 | Stuff for Foodies
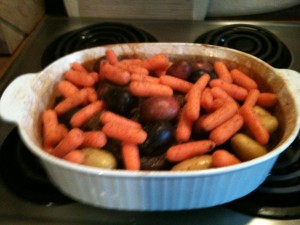 aaah, pot roast. That all-in-one comfort food, so perfectly balanced with everything we want – so tender and lovely, melting away on the fork, slipping into the gravy like a sultry little temptress, falling apart on the tenderized potatoes and carrots swimming nearby.
I am a fan anyway, so years ago, I had my mother-in-law show me what she did to make hers so good (they are always excellent, Shirley!), and kind of messed around with it for a while to come up with a recipe that always works.
What I am going to offer here, is more for my son and his friends/roomies at college – a nice way to prepare a big (5+ pounds) pot roast for you and the fellas…a family style meal, that allows you to build it, leave it for most of the run, and then come back to eat it later with everyone – not be fixing sauces or shit when it is go time.
So if you are like my son and his pals at college this year, you don’t have a lot of room or anything to play with beyond a fridge, and an oven.
You’ll need:
- A pan to sear (brown) the roast – a frying pan big enough to hold it. If the roast is too big for your frying pans, you might use a larger baking dish on the stovetop to get thru the browning part.
- An oven
- A roasting pan that allows for the roast, as well as the veggies (note: you can buy a tinfoil one at any large grocery store, and pitch it when you are done if you need to) – it has to fit in the oven too, if you have a small oven.
Ingredients:
- The Roast – assuming you have a big one, like 5-7 pounds or something like that
- Seasoning (this is a dry rub, so it is whatever you want it to be – I’ll give you some ideas below)
- Flour (enough to thoroughly dust the roast, probably a cup or so)
- Olive oil (just a little bit)
- Veggies – limited to what you want, but standard issue would be onions (probably 2-3 vidalias or sweet onions, cut into bite size pieces), carrots (cut) or baby carrots, mushrooms and potatoes (like yukon gold, or red, or any kind of little potato you want – if you use large ones, you’ll need to cut them first, and they will mush up on you – so using small, whole potatoes of whatever type is better. I try to use as many as I can here – a bag full anyway.)
Rubbing Your Meat
OK – as a BBQ guy, I like the use of dry rubs on meats that I cook for long times – I think they bring out flavors, and add depth to otherwise simple cuts, and a roast is a great example of bland, weak meat that benefits from what you can bring into it thru a balanced rub.
So what you blend to create your rub, is up to you and becomes a bit of a personal thing – but mix-up some dry spices in a bowl to coat the roast. If you need help making one up, use garlic powder, onion powder, salt, pepper, cayenne, rosemary, thyme, marjoram, and maybe some cracked red pepper or other extras and you’re gonna have a beauty. You can go with other things like allspice and cumin to add different tones and flavors to it – but the base seasoning to bring out some of the characteristics you want if you are after that old familiar taste, should be garlic, onion, salt and pepper. That gives it the “classic” taste with flavors you’ll remember.
Be generous with the rub – the meat will be covered with more stuff and cooked a long time, so don’t skimp.
I use the little bowl, rather than sprinkling the ingredients directly on the meat – this allows me to mix and balance it before I apply it, and it allows me to season every bit of the surface – I use my hands, and work it in there.
For some fun things to try with the rubs, look at blending brown sugar with hot, spicy seasonings – there are gazillions of ways to go there.

In the picture over here to the left, you can see I have the Kosher salt and the pepper mill there.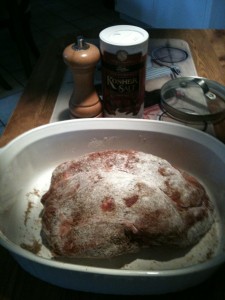
If you are not using kosher salt, chances are good that the salt you use kind of disappears into whatever you are cooking. This may be what you want, but for me, I want to find the salt in there – I don’t want to absorb it, I want to taste it. And by taste, I am not suggesting being overwhelmed by too much of it – simply the little edge you get from kosher salt, staying in there a little longer comparatively. Same goes for the pepper – the difference in crunching the peppercorns or using the dry stuff is night and day, as far as flavor goes.
In the case of the classic pot roast, we are looking for salt and pepper tastes – so I suggest going with kosher or sea salt, and crushed peppercorns. For this one, I added these spices AFTER I rubbed it with other stuff.
Once the meat is properly seasoned, you are going to dust it with flour so you can brown it, as seen to the right, above. Maybe now, turn on the oven to bake at 350, so it will be ready for you.
Brown the Meat
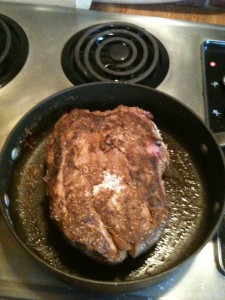 After you have the roast properly seasoned and floured, you want to sear it in a hot pan with a little oil in it. What this will do is create a nice little crust on the outside, plus, it helps to seal in the juices as it cooks.
Heat a skillet big enough to hold the roast, and put olive oil in – enough to coat the bottom. 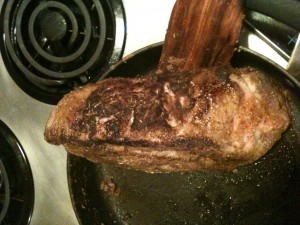 Let it get really hot – you don’t want to put the meat in too soon, and have the pan heat up with the meat in it, that’ll totally mess up your browning. But just a couple minutes per side – and if you can manage it without making a mess, searing the edges is a nice touch.
Over on the right there, you can see I am doing just that. I think it helps to seal it all up, like a big flavor football for you.
 Once the meat is browned on every surface as you want (and edges are an option, not necessity) transfer it to the roasting pan. I usually have a bed of onions, waiting there.
Then you want to quickly deglaze the searing pan, so all that flavor that seared into it can be part of your meal.
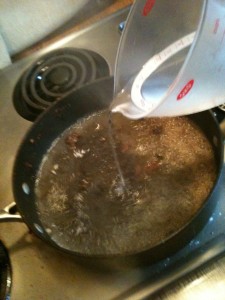
Keeping the empty frying pan on the med-high heat you had it for searing, pour in a about a cup and a half of water, slowly.
You’ll see it turn colors, and pull all the seared bits off the pan – this is what you want. Stir it a couple times, to get everything off the pan, then just pour it over the roast in the roast pan.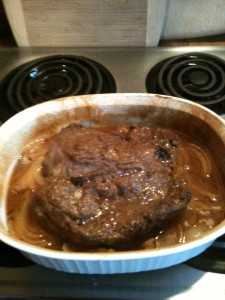
This water will become your gravy, and will tenderize the roast as it cooks.
Usually, I will hit the roast with a couple shots of Worcestershire sauce, then cover the whole thing with tinfoil. Then you’re good to go – you want to cook the meat on its own for a good hour or two, then add the veggies later. On the right, is what it looked like after I cooked it for 90 minutes at 350. You may need to add a little more water – depends on how well you seal the tinfoil and how much cooks up/off.
Cooking, and Finishing the Pot Roast
The actual cooking time you need, depends on the size of the roast. Anything over 2 pounds I like to give at least 3 hours to – extra time tenderizes. But at 300 degrees or so, an hour per pound is about right. The veggies should be added about an hour before you want to eat…assuming you are over 300 degrees.
Think of it like BBQ, in that a large hunk of meat likes to cook long and slow, at a lower heat. So if you do the initial hour at 350, you could do the long stretch at maybe 250-300, and add more time. If given a choice, always opt for lower heat, longer time for a good roast. Make sure you have enough water in it too, to be cooked into it…if you cook that off too fast, the roast can get really dry.
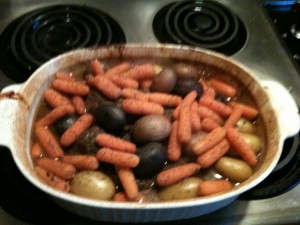 This one took just under 3 hours – I did 90 minutes with the roast alone, then close to that again with the veggies. I added a little dill, and salt and pepper to the veggies. It was at about 300-350 the whole time. I kept it covered it in tinfoil while cooking too, to help retain juices.
But the cool thing with this, is once it goes in the oven, other than adding the veggies it is hands-free. It may take a couple hours, but it is worth it, and you can play XBox or study while it cooks. Study! It’ll make the house smell fantastic while it cooks.
One thing you can do, is pre-prep: brown the meat and cook it for an hour then wrap it, and wait to finish it until you want to eat it. You could prep the meat in the morning, come home for lunch and throw it in the oven (probably lower than 350, depending on your timing), come home from classes and add the veggies to finish it, cooking it at 350 for an hour. A crock pot opens other options too.
The Key: Not Everything at Once
The key to your classic pot roast, is to not add everything at one time, up front. That may be easier, but it will turn the veggies into mush after a couple hours.
Instead, if you season, sear, and roast the meat and then add your veggies to finish it, everything has and holds onto more of a character you can appreciate. Don’t make something that is easy, something stupid because you want to cut corners. It does take a little time and care to brown the meat and time it all out right, but the results will have you licking your plates. And it is really easy, no matter how it seems after all this talk about it.
I guess to finish this Auburn style, there has to be some beer involved, but I am not going to support that kind of behavior. War Damn Eagle!
 I was also using this outing to experiment with more things in my new clay cooker. I had a great little Romertopf forever, but then brought it to a dinner party a couple years ago and never got it back. Lucky for me, I found one at a junk store last month for $20, brand-spanking-new – it is a little larger than my last one, and has a glazed interior, which were both cool perks.
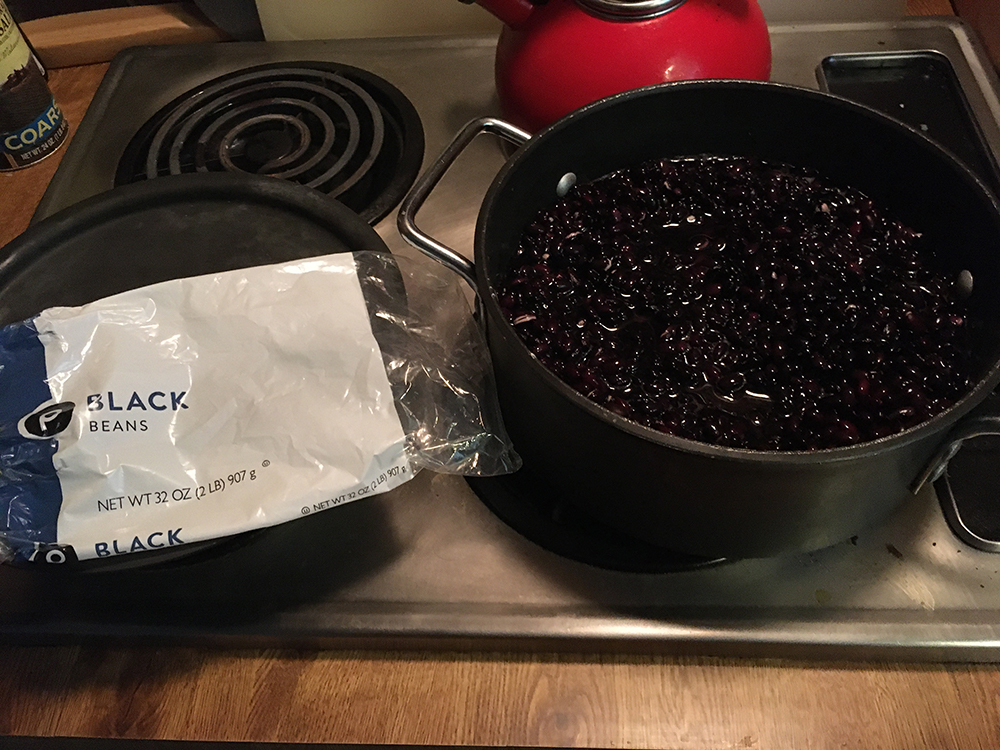 So in typical black bean fashion, I started with a bag of generic dry black beans – 32 oz. I submerged them in a lidded pan full of warm water, about 4 quarts worth, and let them sit, covered, for a total of about 24 hours.
 After they have properly soaked (minimum time would be overnight), I rinse them well, and set them aside for a while to prep the veggies. Rinsing only helps get the gunk off them – look for stones too, which I actually see in there pretty often. The beans will be pretty uniformly the same when they are soaked well.
 When I make black beans, I make them the way I learned in the Jamaican restaurant I worked in during the late 80s/early 90s – because they did them so wonderfully. It is a kind of “kitchen sink” approach to it – you throw in anything you got, and know you are generally only going to make them better if you have more stuff in there and cook them down long enough.
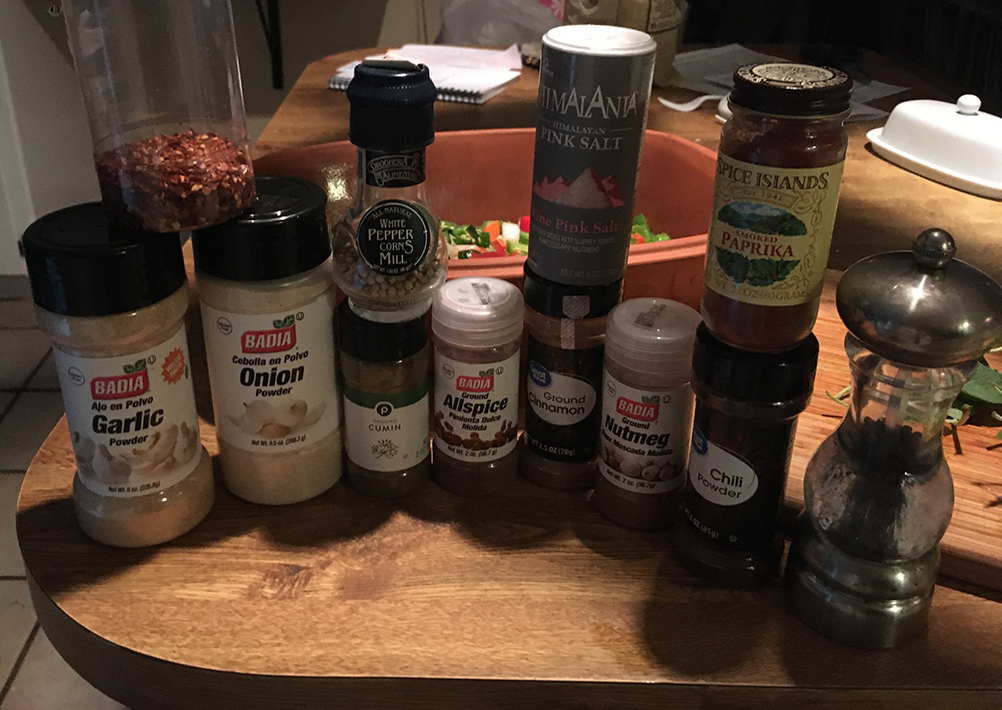 In much the same manner as emptying your fridge to build an interesting undertone, the spices you use for your beans are going to become the true stars of the show.
 I don’t stop there though, and will grab thyme, coriander, marjoram, bay leaves…anything and everything might get thrown in for good measure.
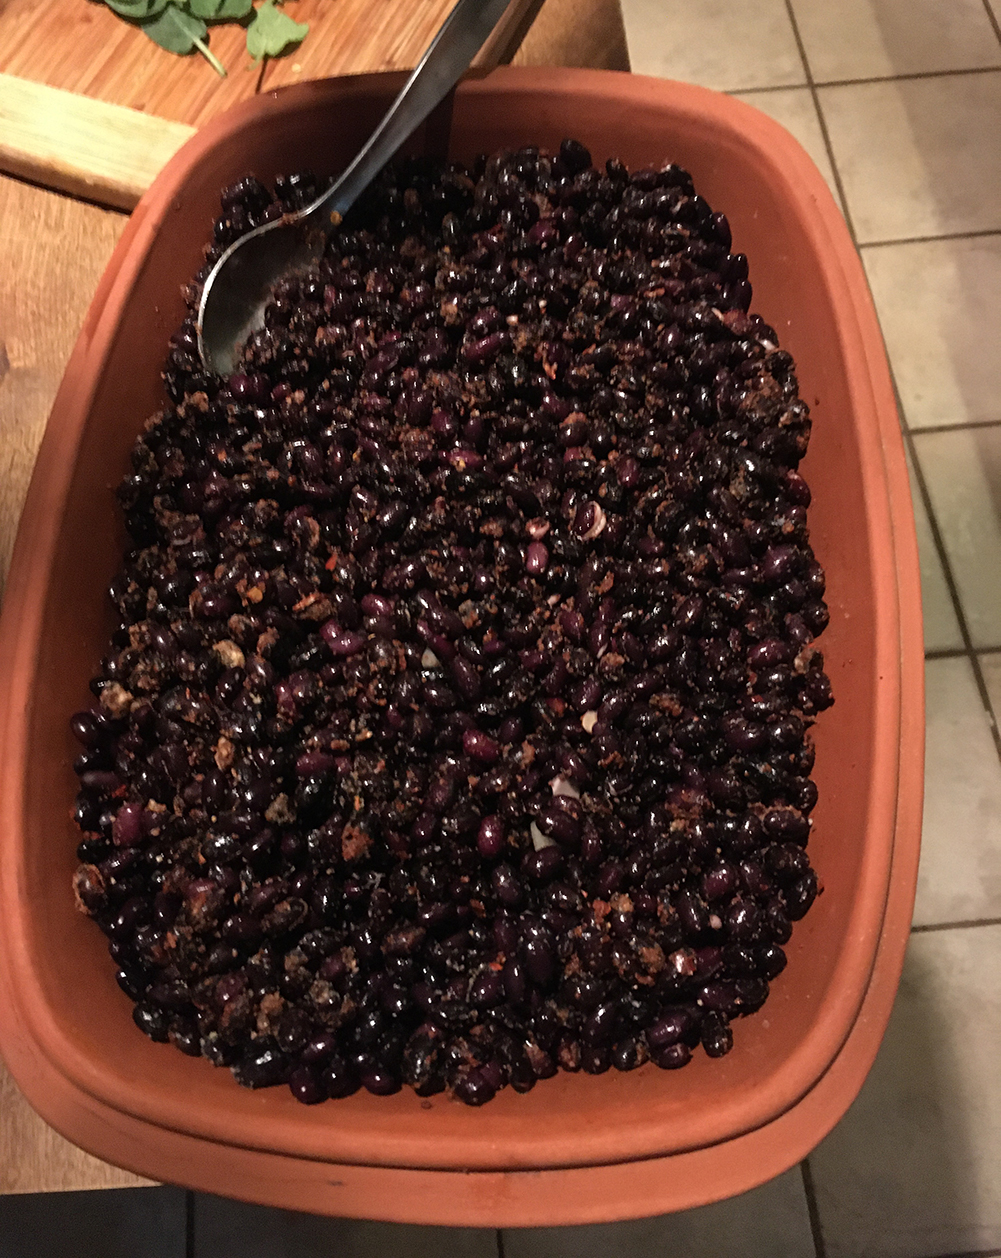 It did not matter – in much the same way, it does not matter what you do for your spices as long as you understand to be happy and liberal with them. If you have a lot of fresh stuff on hand, even better – I didn’t, so went with the stuff I did have and knew they’d be wonderful.
 Once I had the dry spices mixed in the beans, I went to the herb garden and pulled some oregano and sage – they were again, the ones that were there, so they were nominated. Rosemary, fresh, is perfect for beans – basil works well too, as will cilantro, tarragon and most things your herb garden might have.
 For these, I dry-spiced and mixed the beans, then I added 2 boxes of vegetable broth. I chopped my fresh herbs and put them on top of the finished beans – they were intentionally last, much the same way the veggie layer was first. Why? To take full advantage of the way the clay cooker works.
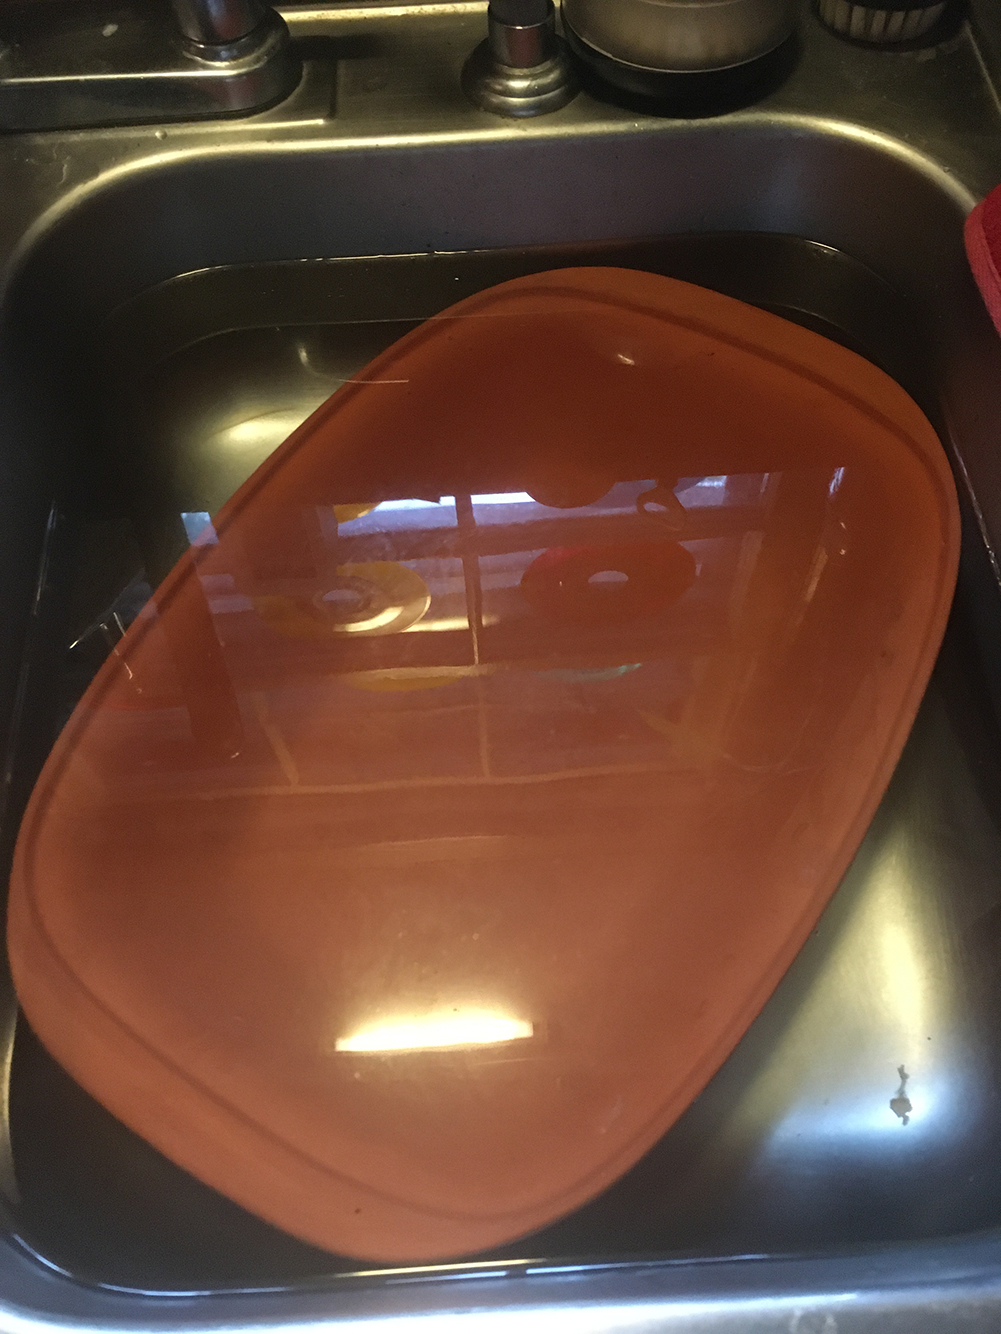 I tend to find in clay cooking, there are two general ways to go – either low and slow, or hot and quick. Both methods have their benefits and limitations, depending on what you are cooking. Beans like this, without any meat or grease in them, should probably be somewhere in the middle of that.
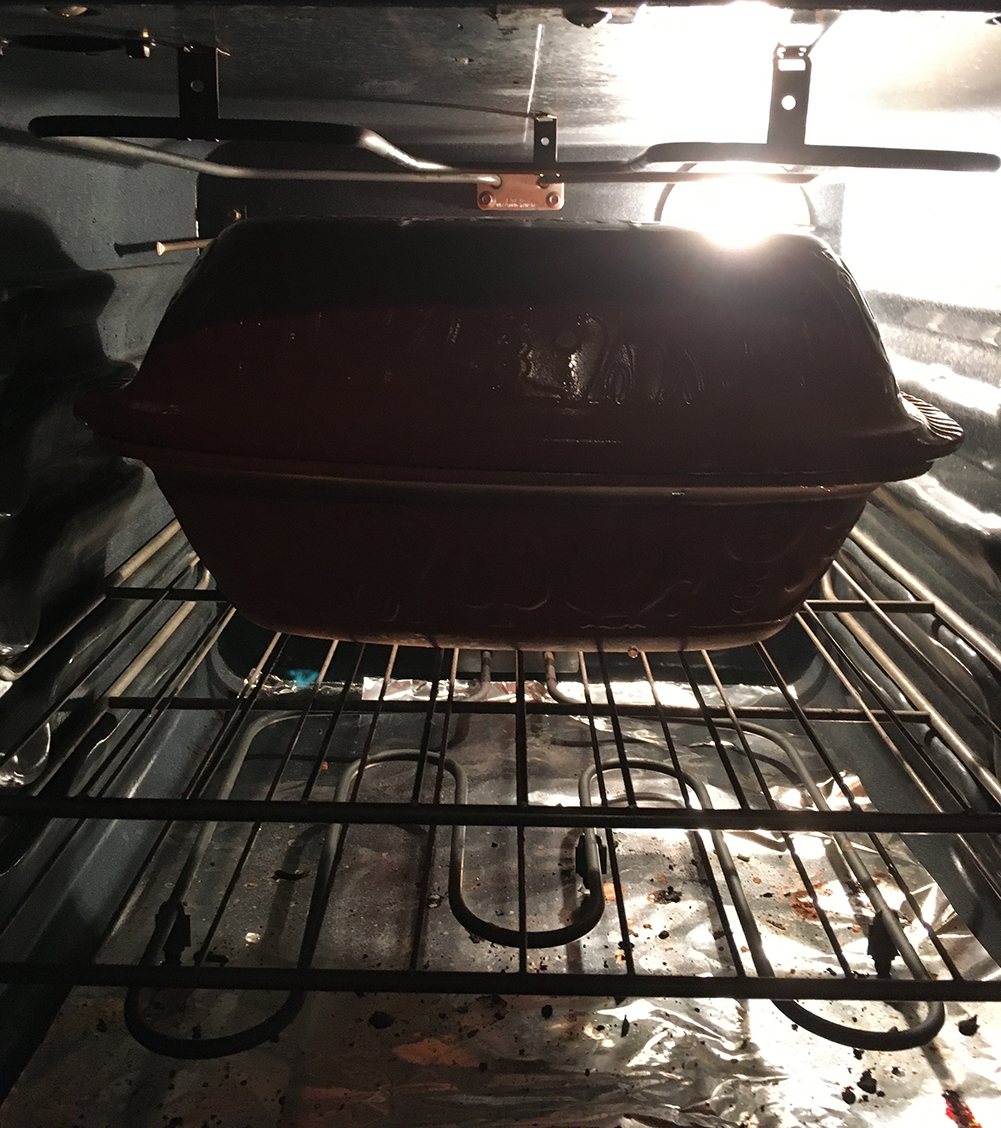 What happened with mine, was in the time they cooked, the broth got sucked up into the beans – so there was not originally a lot of that “glorious goo” I mentioned at the beginning of this. Ooops. The flavor was still amazing, and the beans had a great consistency to them – but I wanted them still a little softer, which I could’ve had with more liquid, and maybe playing with the heat some and making it hotter in there.
 When I took the beans out, the herbs on top were dried and fragrant – so I stirred them into the mix. I pulled up the veggies too, or whatever was left of them really…they behaved perfectly and were simply part of the beans now.
 Unlike a can of beans, these had all retained their body – they smelled incredible too, with all those spices and herbs just dancing around the kitchen.
 I broke my rules too, and had to top this off with sour cream and salsa – sour cream may not be vegan, but it is a great add to black beans. I might even go as far as mandatory, but like I said before, I am pretty weird. Vegans might substitute something else here, but I wanted the dairy and I did lay off the salt pork, so felt vindicated. I was alone anyway, so no harm, no foul.


